

As professional digital marketers, we’re facing constant changes in our industry. It’s important to stay up-to-date with new digital marketing tools that are necessary for our data-driven approach. The next big change that’ll come our way is the migration from Google Universal Analytics (a tool used to track in-depth user engagement across the entire websites and apps) to the new Google Analytics 4 (GA4) property – the deadline for migration is July 1st, 2023.
To get ahead of this newest update, this blog post offers you a step-by-step guide on how to create Google Analytics 4 audiences with the use of Google Tag Manager. This handy tool allows us to manipulate non-essential website codes in a user-friendly environment.
What Are GA4 Audiences and What’s Their Purpose?
First, let’s go over what Google Analytics 4 audiences actually are.
Audiences are groups of users that share the same attributes you consider meaningful to your business. What we mean when we talk about audience attributes is their level of engagement, which is defined by metrics, dimensions, and/or events.
Also, you can use these selected groups to show ads to them, which makes them interesting groups for the business – this is called retargeting.
Thus, audiences can be mid to bottom of the funnel, depending on the level of engagement. The more engaged the audience is, the more it goes to the bottom of the funnel. (Want to learn more about funnels? Check this out.)
In the new GA4, there are multiple upgraded features when it comes to the audience part compared to the Universal Analytics.
GA4 is based on events, therefore with the use of Google Tag Manager, now we have the ability to be very creative when it comes to creating GA4 events, from which we can create different remarketing groups/audiences to show our ads to.
How to Create Google Analytics 4 Audiences Using GTM?
As an example, we will segment avid readers of your blog section by grouping users who spent more than 3 minutes on any blog post. Although this is not a definitive indicator of engagement (somebody might have to walk away from their computer while your page is open in their browser), this segmentation will give you better data-driven insights into your community and it will give you additional options if you want to target them with tailored advertising campaigns.
In order for you to be able to create this particular audience, the first step will be to navigate to Google Tag Manager and create a Timer trigger.
This is the part where you can be creative by using various trigger types (such as scroll depth, page view, Youtube video, timer, etc) to create different audiences. Basically, you can create an audience based on all available triggers.


Before the next step, let’s explain a bit more about the Timer trigger. The most important segment of this trigger is an interval – “The number of milliseconds between firing events”. Also, we have conditions such as limit – “The maximum number of times to fire the event” and Page URL containing /blog – we need this condition to make sure that part of our audience is users who spent 3 minutes only on our blog page, not the entire website, or some other page on the site.
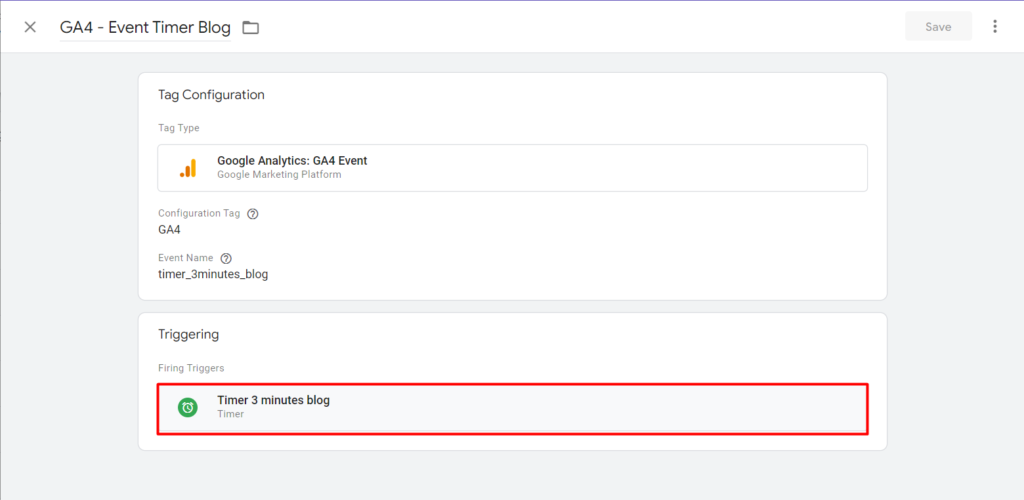
The next step in the process will be to create a GA4 event tag in Google Tag Manager, which will later be used as an audience attribute. This tag will have a timer trigger that we created in the previous step.
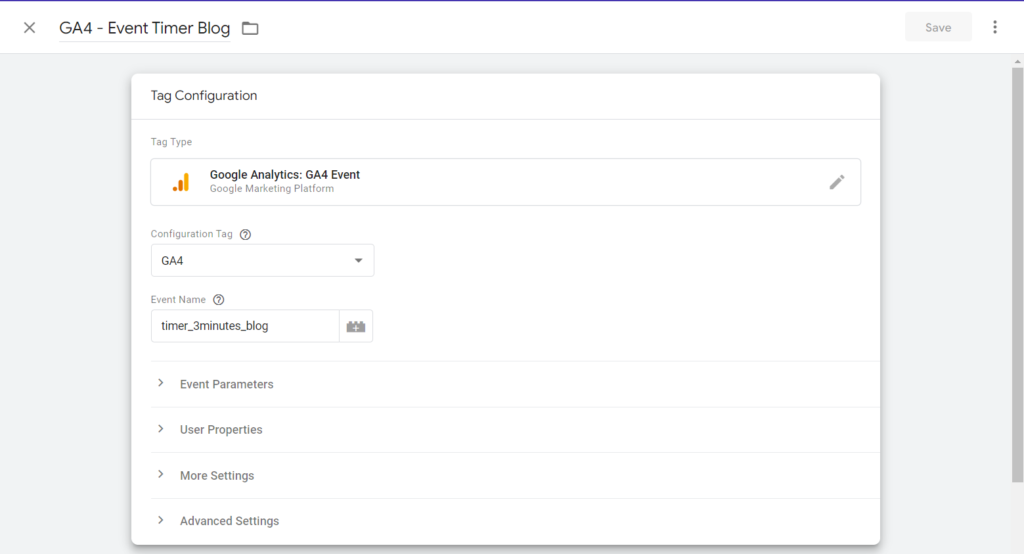
Once you’re done with the tag creation, you will select the “Preview” button, in the right side corner of your GTM homepage, where you will test if the previous one is working properly.


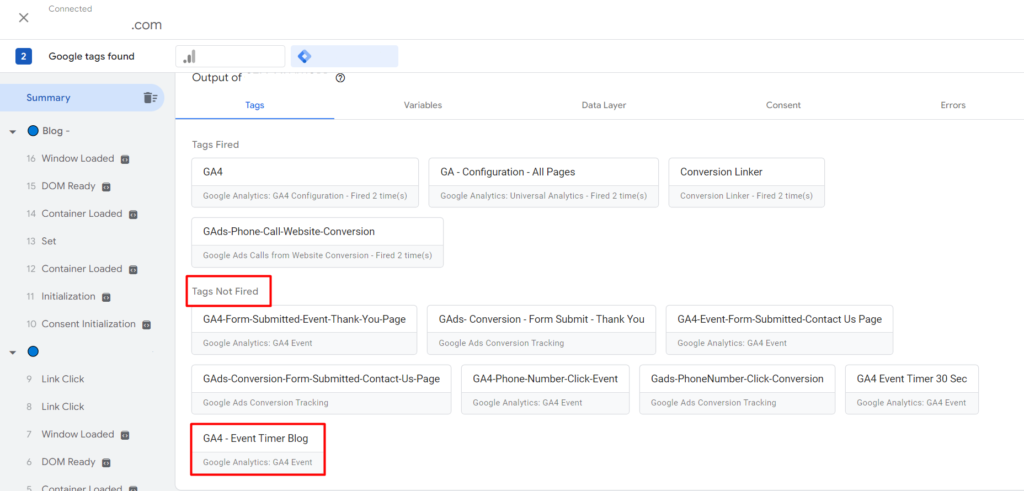
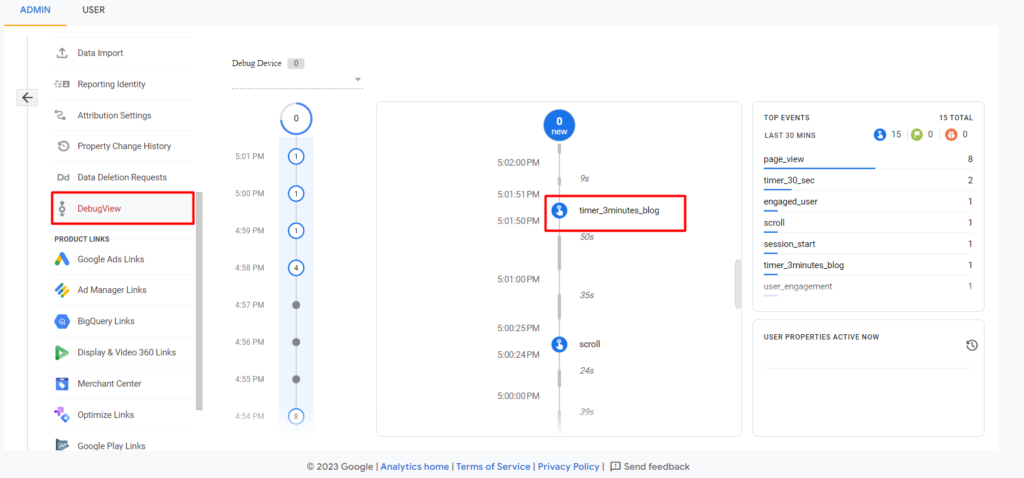
Once you’ve entered the “Preview” mode, you will take a closer look at the “tags not fired” part. This is the part where you should see your GA4 event tag.
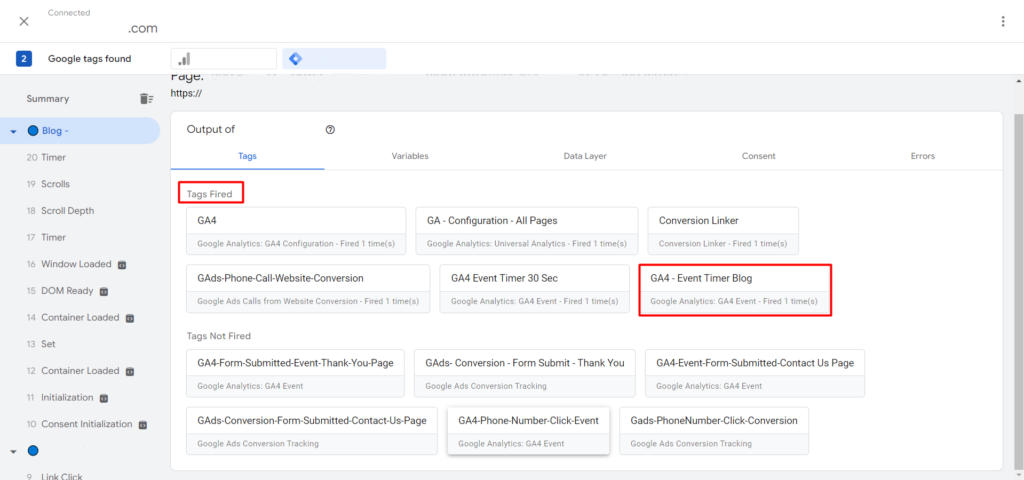
After successfully spending 3 minutes on the blog page of the website in the “Preview” mode, you should be able to see your tag in the “Tags fired” part. So now you are sure that your tag is working properly, and you’re ready to publish the changes you made in your GTM workspace, by clicking on the “Submit” button on the upper right side.

Creation of Custom Audience in GA4
After you’re done with the GTM part, now you’ll create a custom audience in GA4, to which you will attribute the timer event you’ve created in GTM. Note that the GA4 event you’ve created previously in GTM can take up to 24-48 hours to appear in GA4. Once the event appears, you will be able to test this audience in debug view in GA4, and also you’ll be able to see the audience summary on the right.


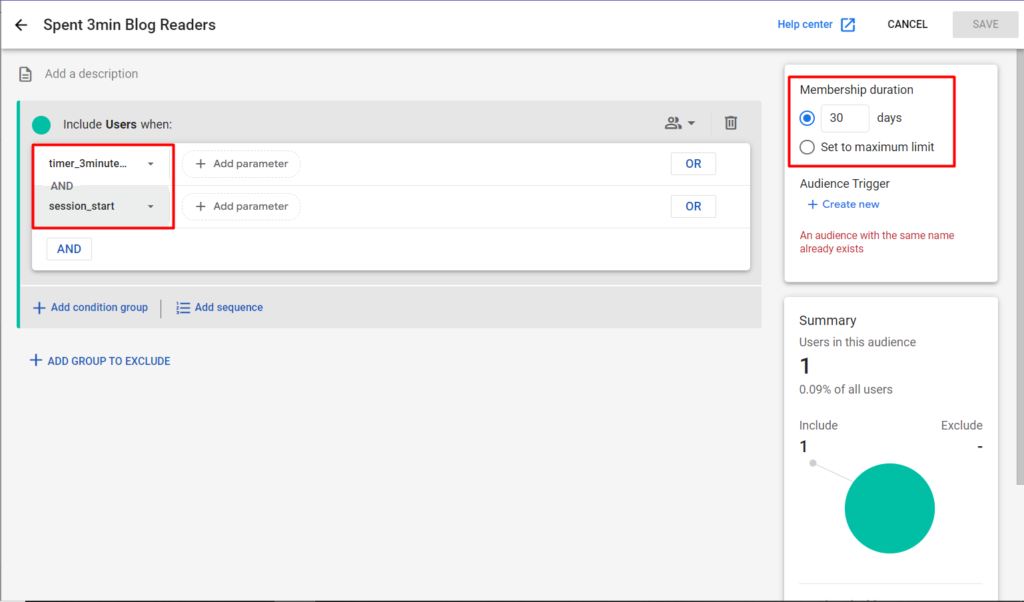
And now we’ve come to the final steps. Firstly, you can create an audience trigger and test your audience in the debug view of GA4. Secondly, you’ll link your Google Ads account in order to be able to see the created audience in Google Ads. Note that you can be visible in the debug view of GA4 only when you are in the preview mode of GTM, or you’ve enabled the Google Analytics Debugger extension.


And congrats! You’ve created your engagement-based audience!
As previously mentioned, the digital marketing industry is known for its fickle nature. Keeping up to date with the latest trends and updates can be challenging even for a seasoned marketer.
Therefore, if you need assistance with:
- Transitioning to GA4
- Creating ad campaigns
- Maintenance of your Google Ads account
or you just need a thorough analysis of your Google Analytics, Will Marlow Agency is here at your service. Our team of data-driven PPC experts will assist you through every step of your digital marketing journey.
Want to learn more about digital marketing? Check these out:
- Instagram Do’s and Don’ts for the Business User
- Why You Should Have Access to the Facebook Audience Interests (Full List)
- On Google Ads Algorithms


Data-Driven Training
We created Royku to train marketers in data-driven marketing.